Press 2 in the Main Menu to go to pulseEKKO PRO System Setup Menu.
Press the appropriate button to access each menu.

pulseEKKO PRO System Setup Screen
Press the 3 button to access the pulseEKKO PRO Survey Parameters. This menu will control how the survey is set up and conducted.
Survey Parameters
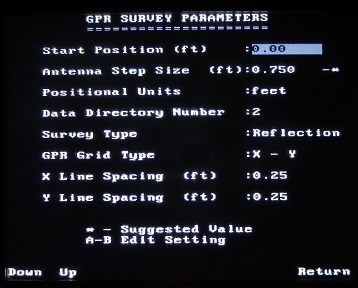
pulseEKKO PRO GPR Survey Parameters Screen
Use the Up and Down buttons to toggle between each parameter. Edit the values with the A and B buttons. Recommended values are indicated by an asterisk.
Start Position
The start position is the position where data acquisition begins. Generally this is set to 0.0. However, if the user wants to start a data file at a different position, this number can be edited. For example, if a survey starts 5 feet from a building wall, a user may want to set the starting position to 5.0 feet.
Antenna Step Size
This is one of two places the antenna step size can be adjusted. The GPR SmartCart collects traces at fixed intervals, or step sizes. Antenna step size corresponds to an actual distance recorded with the odometer. Smaller targets require a greater amount of detail or a smaller antenna step size. On the other hand, larger objects may be suitable for a larger step size. Smaller step sizes will require more memory because a greater number of traces are required along a fixed distance. Therefore, take into consideration the amount of detail needed and implement best practices of surveying theory to gather the necessary quality data. Also, bear in mind that a smaller step size will require the cart to move at a slower pace than a larger step size. Moving the cart too quickly can result in missed or dropped traces. Recommended antenna step sizes for the 50MHz are 0.5m or 1.5ft, the 100MHz is 0.25m or 1ft, the 200MHz is 0.1m or 4in, and the 1000MHZ is 0.01m or 0.5in.
Positional Units
Determine whether to use the metric or imperial measurement system. Once the measurement system is set, all the parameters will be measured in that set of units.
Data Directory
The Data Directory is where data will be stored. The directory is named by number. Each directory stores 100 lines, starting with 0 to 99. Lines from multiple directories can be merged in post processing software to create a larger survey. It is best to store lines together that are related. For instance, if possible, store all the lines in a survey in one directory. Keep field notes documenting what lines are stored in each directory.
Survey Type
The pulseEKKO PRO Survey Parameters can be configured to do different types of surveys with many types of configurations. With the SmartCart or TR1000 configuration, the survey type should be a Reflection survey.
GPR Grid Types
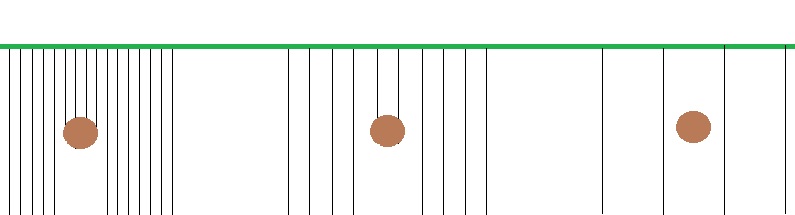
Create a grid using the X axis, Y axis, or both. The XY grid often provides the best information but also demands that the user creates a consistent and accurate grid. Grid data is a collection of parallel and perpendicular GPR lines. In contrast, line data may consist of GPR data collected along random line paths, spacings, and locations. If collecting GPR data using a grid, it is important to designate the grid dimensions, line spacing, grid type (parallel lines or perpendicular lines), and survey format. In addition, if surveying for linear targets like pipes or facilities, the GPR will perform better if data lines are conducted perpendicular to these targets. Grid surveys are great for a more detailed analysis. Make certain that starting point is consistent. Read more about creating a grid here.
X Line Spacing
X Lines parallel the X axis. Determine the distance between each X line. Remember that for better plots and greater levels of confidence it is recommended to overlap the area the GPR covers at depth. Large spacing will lead to gaps in the data!
Y Line Spacing
Y Lines parallel the Y axis. Determine the distance between each Y line. Remember that for better plots and greater levels of confidence it is recommended to overlap the area the GPR covers at depth. Large spacing will lead to gaps in the data!
Station Interval
Note on Spacing:
Determine the amount of space between transect lines in the grid. Grids with lines collected parallel to only the X-axis need X values; whereas, grids with lines collected parallel to only the Y-axis need Y values. Grids with lines parallel to both X and Y axes need both X and Y values, but the values do not need to be the same. Line spacing is important! Smaller targets require a tighter line spacing. Therefore, be mindful of the detail needed and have a good understanding of the sampling theory required to obtain desirable results. In general, it is not unreasonable for the PulseEKKO Pro 250 to have lines spaced 18 inches apart, the PulseEKKO Pro 500 to have lines spaced 9 inches or less, and the PulseEKKO TR1000 to have lines spaced 4 inches or less. An improper line spacing can lead to gaps in the data, which may lead to aliasing, misleading results, and/or poor post processing results. A common mistake users make to reduce the amount of time to conduct a GPR survey is to space lines too far apart. Lines spaced close together not only better define a target at depth but often provide redundancy that increases one’s confidence in the results. Many parameters of a survey can be changed in post processing but nothing can change the amount of raw data collected, except resurveying. Please exercise common sense.
Exit pulseEKKO PRO Survey Parameters by
hitting the number 8 key.