The Noggin Plus DVL Interface
is easy to understand. The Noggin Plus DVL Interface consists of four basic areas, turning it on, adjusting the display, memory, and understanding the main menu display. Each screen will have a menu of options. Each option will have a corresponding letter or numeral to choose.

DVL Interface
To turn on the DVL
push any button on the DVL face. If the DVL does not initiate there may be problems with low battery power or battery connections. Signs of low voltage or power are part of the Noggin Plus DVL Interface, see below.
Voltage Indicator:
Once all cables between the Noggin Plus, DVL, and the battery are connected, the DVL’s voltage indicator and a red LED light should be seen.
If the light flashes for 30 seconds, the Noggin Plus battery is low and should be recharged. If the light does not turn on at all, unplug and plug the the battery connector and the large connector connector on the back of the DVL. Sometimes these connections are not plugged in tight enough to be locked in.
Menu Buttons:
The Noggin Plus DVL interface has eight, yellow, numbered buttons used in the DVL menus. There are also two general purpose buttons labeled A and B. All button functions are dependent on a particular DVL menu. In other words, a button’s function is specific to what menu is displayed on the DVL.
Screen:
The Noggin Plus DVL interface screen is a grayscale LCD. Newer versions may have color, for example, the DVL400.
Brightness Buttons:
Increase or decrease the screen brightness using the yellow brightness arrow keys on the Noggin Plus DVL Interface. Brightness may need to be changed depending on the field conditions. It is important to remember that increasing the screen’s brightness will also decrease the battery’s life. It is often difficult to see the LCD screen with bright sun or glare from lights.
Contrast Buttons:
Increase or decrease the screen contrast using the yellow contrast arrow keys. Contrast may need to be changed depending on the field conditions. It may help the user see weaker signals when surveying. Too much contrast may over saturate the DVL’s LCD display and make it nearly impossible to see the results. Adjusting the contrast has no discernible effect on battery life.
Compact Flash Drives:
The DVL possesses an internal compact flash drive for its firmware. It also possesses an external, removable compact flash drive. Data can be stored on either drive. To avoid having to copy data to the external drive, set the external drive as the storage drive during a survey. The benefit of storing data internally is that there are two copies after the data has been transferred to the external drive. Be aware that the internally stored data will overwrite the files on the external drive when the files are copied. It is easiest to store information on the removable compact flash drive to avoid data transfer hassles.

GPR DVL Compact Flash Drive
Additional compact flash drives can be bought. Drives must be 2 gigabytes in size or less. A compact flash card reader is needed if the user wants to transfer data from the compact drive to the computer. This is the preferred method.
Before removing or inserting the external compact flash drive, power off the DVL. To access the removable flash drive, loosen the finger screws. Swing the access door to the side to reveal the flash drive at the top of the DVL. Press the button to eject the drive.
Start up Menu:
After the Noggin Plus DVL interface powers up, the Start up Menu appears with four options.
A – Noggin: Access software for the standard Noggin system.
B – Noggin Plus: Access software for the Noggin Plus system.
Note: This website will focus on the Noggin Plus because it has all the capabilities of the Noggin and more.
1- Contact Us: Displays manufacturer’s contact information.
2 – Power Off: Turn off the DVL.
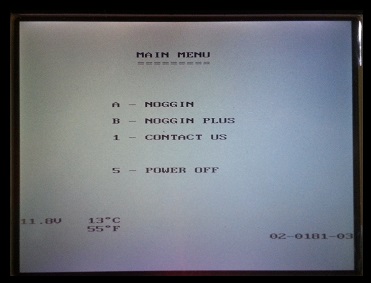
DVL Startup Menu
The Start up menu also displays pertinent information.
Battery Voltage: If the system’s voltage falls below 10.2 Volts, the DVL will turn off.
Temperature: The DVL’s internal temperature is displayed in Celsius and Fahrenheit on the DVL screen.
Software: The DVL’s operating software is displayed.