Start up the pulseEKKO PRO to access the Interface.
Turn on the Transmitter and Receiver:
If using the SmartCart configuration, power On the transmitter and receiver by pressing the push button on top of each unit. The red LED will flash five times and then stay on when ready for recording.
Turn on the DVL:
Press any button on the display to boot up the DVL. The red LED on the DVL should be lit indicating that the DVL is receiving adequate power. If after turning on the DVL, the red LED on the DVL is flashing for 30 seconds and then going out, the external battery that powers the DVL is low. Recharge the battery. Ensure a working battery by charging it after every use or during breaks in the survey.
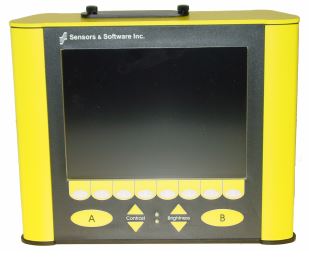
pulseEKKO PRO DVL Interface
Menu Buttons:
The pulseEKKO PRO DVL interface has eight, yellow, numbered buttons used in the DVL menus. There are also two general purpose buttons labeled A and B. All button functions are dependent on a particular DVL menu. In other words, a button’s function is specific to what menu is displayed on the DVL.
Screen:
The pulseEKKO PRO DVL III interface screen is a grayscale LCD. Newer versions may have color, for example, the DVL400.
Brightness Buttons:
Increase or decrease the screen brightness using the yellow brightness arrow keys on the pulseEKKO PRO DVL Interface. Brightness may need to be changed depending on the field conditions. It is important to remember that increasing the screen’s brightness will also decrease the battery’s life. It is often difficult to see the LCD screen with bright sun or glare from lights.
Contrast Buttons:
Increase or decrease the screen contrast using the yellow contrast arrow keys. Contrast may need to be changed depending on the field conditions. It may help the user see weaker signals when surveying. Too much contrast may over saturate the DVL’s LCD display and make it nearly impossible to see the results. Adjusting the contrast has no discernible effect on battery life.
Compact Flash Drives:
The DVL possesses an internal compact flash drive for its firmware. It also possesses an external, removable compact flash drive. Data can be stored on either drive. To avoid having to copy data to the external drive, set the external drive as the storage drive during a survey. The benefit of storing data internally is that there are two copies, after the data has been transferred to the external drive. Be aware that the internally stored data will overwrite the files on the external drive, when the files are copied. It is easiest to store information on the removable compact flash drive to avoid data transfer hassles.

GPR DVL Compact Flash Drive
Additional compact flash drives can be bought. Drives must be 2 gigabytes in size or less. A compact flash card reader is needed if the user wants to transfer data from the compact drive to the computer. This is the preferred method.
Before removing or inserting the external compact flash drive, power off the DVL. To access the removable flash drive, loosen the finger screws. Swing the access door to the side to reveal the flash drive at the top of the DVL. Press the button to eject the drive.
pulseEKKO PRO Main Menu
The DVL buttons change function depending on the menu displayed on the DVL. On each menu, a list of options appears with a corresponding DVL button.

pulseEKKO PRO Main Menu Screen
The Main Menu contains five options: Run PulseEKKO GPR, System Setup, View Setup, File Management, and Shutdown.
Run pulseEKKO PRO
Press 1 to access the Run pulseEKKO PRO menu. The Run pulseEKKO PRO menu contains options to collect data as a line, grid, run without saving, and accessing the scope mode. In general, it is important to setup the survey parameters before collecting data.
System Setup
Press 2 to access the System Setup menu. The System Setup menu is important in that it controls how the survey is conducted, collected, and displayed on the DVL. If the user is not continuing a survey, always visit this menu to update survey parameters as needed. Menus within the System Setup menu include GPR Parameters, Acquisition Control, Survey Parameters, Display Parameters, DVL Setup, and View Complete Setup menus.
View Setup
Press 3 to access the View Setup screen to see the current setups without going through every setup menu. This can be useful to confirm settings before starting a survey. Double checking survey parameters before starting or continuing a survey is a quick and easy method of saving the time and trouble of having to redo portions of a survey.
File Management
Press 4 to access the File Management menu. The File Management menu deals with anything pertaining to file storage. In this menu, one can set a storage drive, view files, copy and transfer files as well as delete files and directories. This will be especially important for archiving data and for post processing.
Shut down
Press 5 to shut down the pulseEKKO PRO and leave the pulseEKKO PRO main menu. Always turn OFF the DVL and unplug the battery when done surveying to conserve battery life.
The Start up menu also displays pertinent information:
Battery Voltage: If the system’s voltage falls below 10.2 Volts, the DVL will turn off.
Temperature: The DVL’s internal temperature is displayed in Celsius and Fahrenheit on the DVL screen.
Software: The DVL’s operating software is displayed.