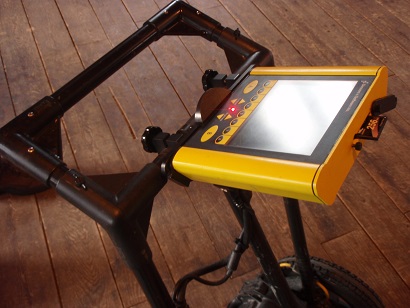
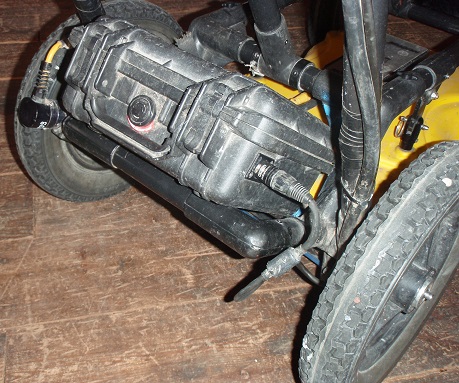
Noggin SmartCart Assembly
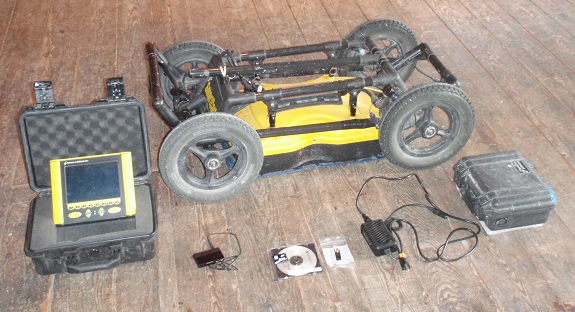
1. Unpack cart and accessories from shipping container.
Organize items as needed. Some components of the cart may already be assembled, depending on how it is shipped. This guide will focus on the complete assembly of the SmartCart in the event that the user must put it together.
2. Begin by installing the four wheels
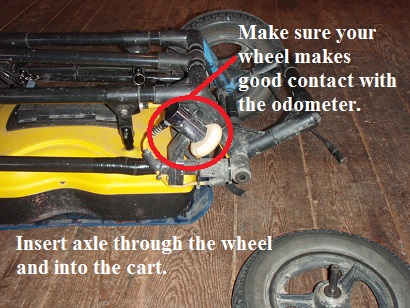
by inserting the axles into the receivers. The button on the end of the axle may need to be pushed to snap an axle firmly into the receiver.
3. Install the handle.
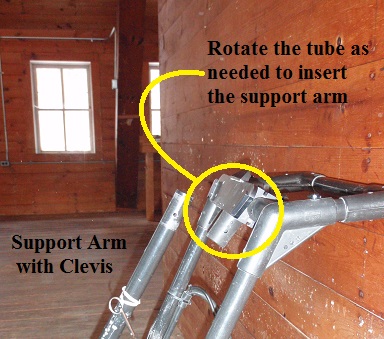
When receiving the SmartCart, chances are that the support arm will be on top of the handle. This allows the unit to fit in the shipping create. To install the support arm to the handle, rotate the handle and the support arm until the support arm is on the far side of the grip. Remove the clevis ring from the handle support arm and bring the handle to the upright position. Connect the handle support arm to the handle by inserting the support arm into the handle’s T-shaped tube. The T-shaped tube may need to be adjusted to get the proper angle to insert the support arm. Finally, insert the clevis pin to fasten the handle support arm and handle together.
3. Check that the odometer wheel on the Noggin SmartCart Assembly
is making proper contact with it cart wheel. Push the cart and watch to see if the odometer wheel is spinning while the SmartCart moves. If the odometer wheel isn’t making proper contact, GPR data will not be collected as the SmartCart is rolled along. Therefore, no recording will occur and data will not appear on the DVL screen. If this happens, make sure the SmartCart wheel is connected tightly to the SmartCart axle receiver and the odometer is making contact with the wheel. If the axle is securely connected to the SmartCart but the odometer is not making proper contact, one may need to loosen the odometer unit with a 1/4th Allen wrench. Reposition the odometer, making sure the odometer is making good contact (do not apply excessive pressure) with its wheel, and tighten the screws.
4. Attach the sensor to the cart.
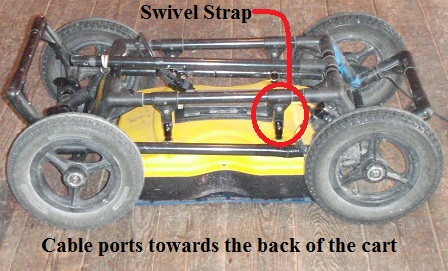
First, connect the four swivel straps by sliding them over the sensor’s four posts. Using a 1/8th Allen wrench, tighten the tension screw to secure their connection. Orientate the sensor so that the cable ports are facing the back of the cart. Next, remove the clevis pins from the swivel straps. Align the holes in the swivel straps with the hangers on the cart’s frame and insert the clevis pins.
5. Snap the Digital Video Logger ( DVL ) into its support shelf.
First, make sure the far end of the cable is plugged into the antenna and locked into place. Confirm the small cable from the odometer is in-place on the back side of the connector at the antenna. Check that the locking nut is fastened snuggly to the back of the connector. Do not over tighten the lock nut. Then, connect the 37 pin cable to the DVL’s 37 pin port, found on the back of the DVL. Align the DVL with the support shelf and slide it downwards in the receiver until the clip on the front edge snaps into place. Gently move the DVL to make certain that it is held in place.
The support shelf’s angle can be pivoted to improve visibility of the DVL. If the support shelf will not pivot, slightly loosen its hand screws located on the bottom side of the shelf.
6. Place the battery on to the lower angled shelf directly below the cart handle.
Position the battery so that its handle is facing the user and the battery port is on the right hand side. Buckle the straps to restrain the battery. Plug the round 4 pin cable into the battery’s port, the plug may need to be rotated before it will slip in to place.
This completes the Noggin SmartCart assembly.
