Noggin Plus File Management Menu
is better understood with a basic understanding of the Noggin Plus File Format. Let’s first examine the types of files recorded by the DVL.
Noggin Plus File Format:
Noggin Plus data is stored in two different kinds of files. The first file is a Header File. It has the extension .hd and is formatted in the ASCII file format. The ASCII file format is used because it can be read by most basic text editors or word processing programs.
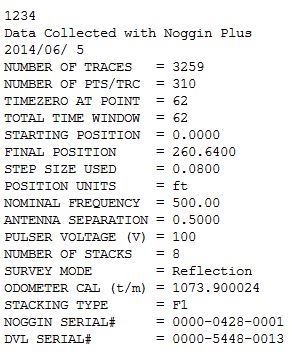
Noggin Plus Header File HD
The second type of file that the Noggin Plus creates is the data file extension: .dat. This file holds a record of each trace collected. Each record contains the following information:
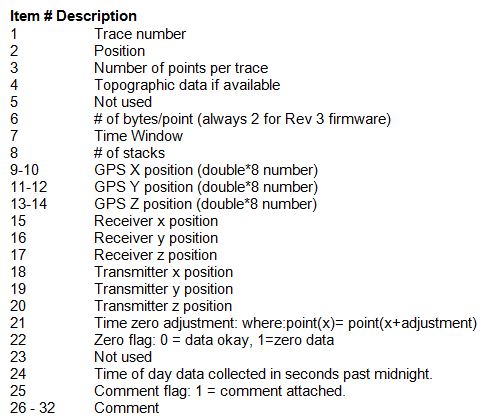
Noggin Plus Data File
Press 2 on the DVL’s main menu to access the Noggin Plus File Management menu. This menu allows the user to edit parameters regarding file storage and transfer. The first three options require a PXFER cable, which is seldom used with today’s DVLs. While transferring files can be done this way, it is easier to avoid this process by copying files to the removable compact flash drive and putting them on a computer with a compact flash drive reader.
Noggin Plus File Management Menu Screen:

Noggin File Management
Press the appropriate button in the Noggin Plus File Management menu to select the following options. Most of the options are self explanatory.
1 – Export Line Project
Transfer a Line Project from the DVL’s Internal Memory to a computer using the PXFER cabled.
2 – Export Grid Project
Transfer a Grid Project from the DVL’s Internal Memory to a computer using the PXFER cabled.
3 – Export GPS Tagged File
Transfer a GPS Tagged File from the DVL’s Internal Memory to a computer using the PXFER cabled.
Note: Transfering data via compact flash drive is the preferred method for Noggin Plus File transfer.
Deleted files can not be recovered!
When deleting Line, Grid, or GPS files, it is possible to select multiple files by using the tag function in the Noggin Plus File Management system. Tag all the files wanted for deletion and push the delete button. Confirm deletion.
4 – Delete Line ProjectNote:
Delete a Line Project saved to the DVL’s internal memory. After a project has been transferred to a computer, it is a good idea to free up memory space on the internal memory. Select Delete Line Project and use the arrow keys to browse the files. Select the appropriate Line Project and push the Delete button. Make sure the project should be deleted before confirming the process. There is not a recycle bin to retrieve deleted projects.
5 – Delete Grid Project
Delete a Grid Project saved to the DVL’s internal memory. After a project has been transferred to a computer, it is a good idea to free up memory space on the internal memory. Select Grid Line Project and use the arrow keys to browse the files. Select the appropriate Grid Project and push the Delete button. Make certain that there is a need for deletion before confirmation. Again, there is not a recycle bin to retrieve deleted projects.
6 – Delete GPS Tagged File
Delete a Noggin Plus GPS file. After a project has been transferred to a computer, it is a good idea to free up memory space on the internal memory. Select Delete GPS Project and use the arrow keys to browse the files Select the appropriate GPS Project and push the Delete Button..There is not a recycle bin to retrieve deleted projects; take notice of the files being deleted.
7 – Copy Internal To Removable
Copy data and/or projects from the internal memory to the removable compact flash drive. This is a useful and easy method of transferring files. It is recommended to transfer all files to the computer before deleting any files on the DVL or compact flash. Make sure there are not any needed files on the external compact flash drive that are needed. The copy function overwrites the data stored on the compact flash drive.
8 – Return
Leave the Noggin Plus File Management menu and return back to the DVL’s Main Menu.