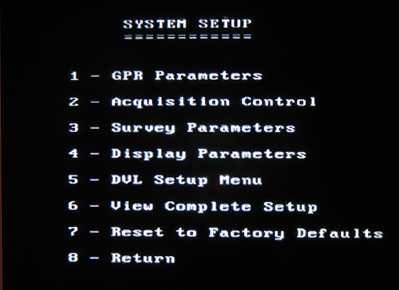
pulseEKKO PRO System Setup Menu
is accessed by pressing 2 on the Main Menu
Press the appropriate numbered button to access each menu. These menus will control the vast majority of how the survey collects and displays data.
GPR Parameters include:
Antenna Frequency, Time Window, Sampling Interval, Antenna Separation, Antenna Step Size, Radar Velocity, System Stacking, and Pulser Setting.GPR Parameters will change depending on which antenna is being used, how it is set up, and what is being surveyed. Read more about GPR Parameters.
Acquisition Control Parameters include:
Trigger Method, Beeper Activated, Free Run Trace Delay, GPS Parameters, Odometer Setup, and Fiber Optic Testing. Acquisition Control Parameters will affect how a survey determines when and how to collect data. Besides recording GPR data, this menu helps the user keep track of line and station positions via GPS or an odometer. Recording spatial positioning is a very important aspect of surveying. Read more about the Acquisition Control Parameters.
Survey Parameters include:
Start Position, Antenna Step Size, Positional Units, GPR Grid Types, X Line Spacing, and Y Line Spacing. Survey Parameters are used by the acquisition software to document the survey geometry. The layout of the survey, its geometry, is often used during post processing with a PC computer. Most of these parameters can be edited with post processing software. The Survey Parameters are the basis of how the GPR lines will be obtained during the survey. Read more about setting the Survey Parameters.
Display Parameters include:
Trace Plotting Type and Gain Type Applied. Control how information is displayed on the DVL with the Display Parameters menu. Regardless of how information is presented on the DVL screen, only the raw data is saved for post processing. The most accurate interpretations and results are often obtained with post processing software.
DVL Setup parameters include:
Time and Date Setup, Set DVL Transfer Mode, and Set DVL into Upgrade Mode. The DVL Setup parameters include basic procedures to transfer data and upgrade software with a PXFER cable, which is seldom used these days. This is not the preferred method of data transfer. Most users will not need to access this screen except to set the time and date. Read more.
The View Complete Setup screen allows
the user to see all the parameters and settings on one screen. This is useful before starting a survey or when returning to an instrument that hasn’t been used for a while.
Reset to Factory Defaults:
will reset all the parameters to the original manufacturer’s parameters. Resetting to the factory defaults is a nice and easy method of removing custom setups by resetting the system. In addition, it is often easier to customize the default settings than it is to edit values from a previous survey.
